vue组件有两种:脚本化组件,单文件组件
脚本化组件的缺点:
1.htm代码是作为js的字符串进行编写,所以组装和开发的时候不易理解,而且没有高亮效果
2.普通组件用在小项目中非常合适,但是复杂的大项目中,如果把更多的组件放在html文件中,那么维护成本就会变得非常
昂贵。
3.脚本化组件只是整合了js和html,但是css代码被剥离出去了。使用的时候的时候不好处理,既要引入js组件又要保存css代码一起引入到页面,相当麻烦。
创建并注册组件
在组件中编辑三个标签,编写视图,vm对象和css样式
组件内容编写
template编写html代码的地方
script编写vue.js代码
style编写当前组件的样式代码
template内部有且只能有一个子标签(2.0版本的限制,3.0版本不限制),组件所有的html代码必须被包,含在这个子标签中。
1 | <template> |
在App.vue中导入、注册并调用Home组件
1 | <template> |
完成案例-点击加减数字
1 | <template> |
在webstorm启动项目
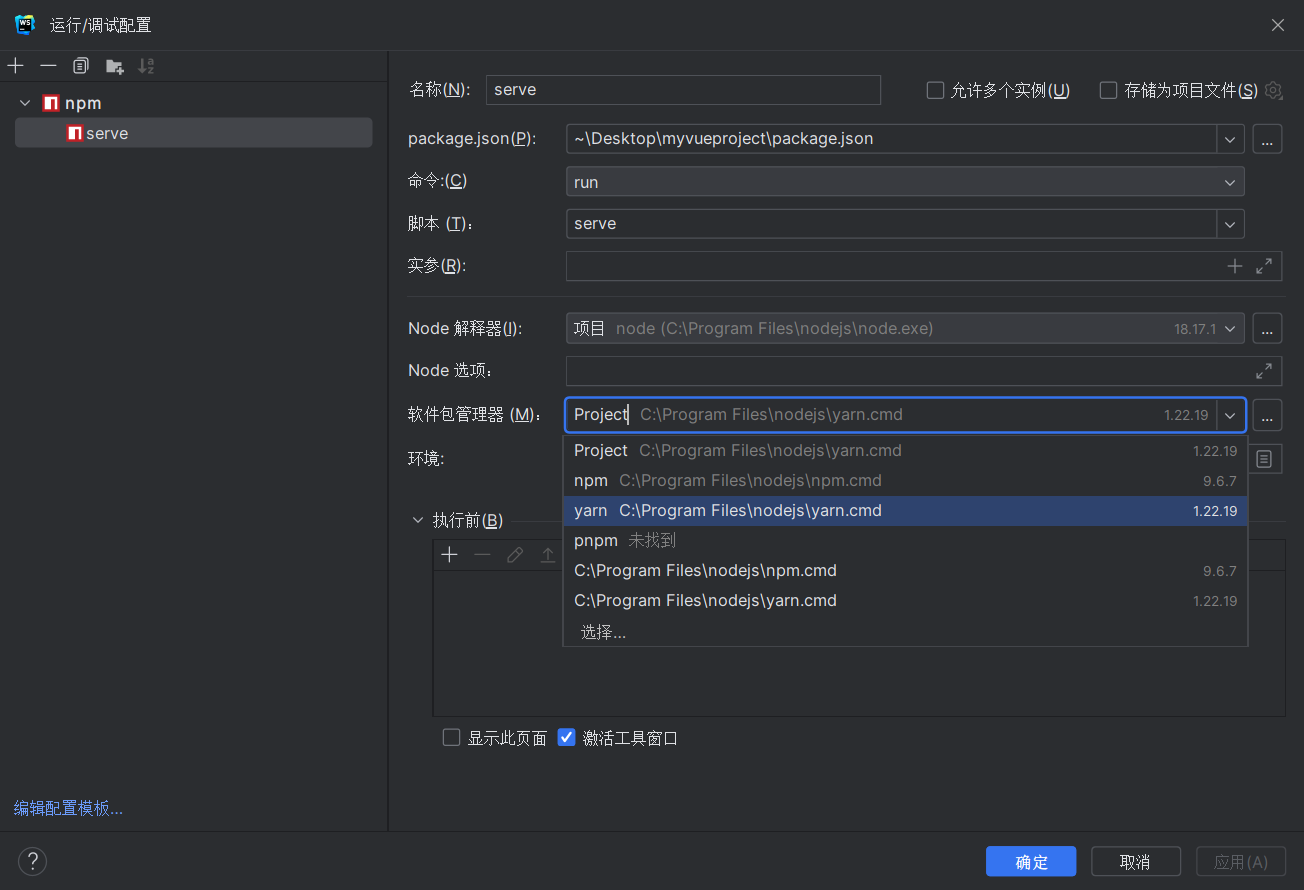
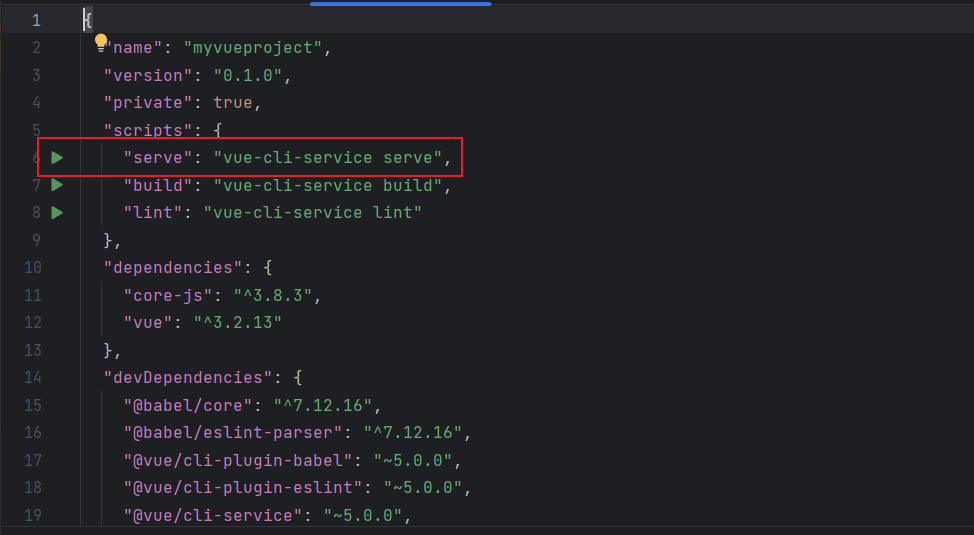
其实在package.json中点击一下哪些以及设置好的命令,他会自动帮我们配置
要注意的一点就是,这个启动的包管理器就如上面所示配置信息最前面写的是Project而不是yarn,但是在后面写了yarn
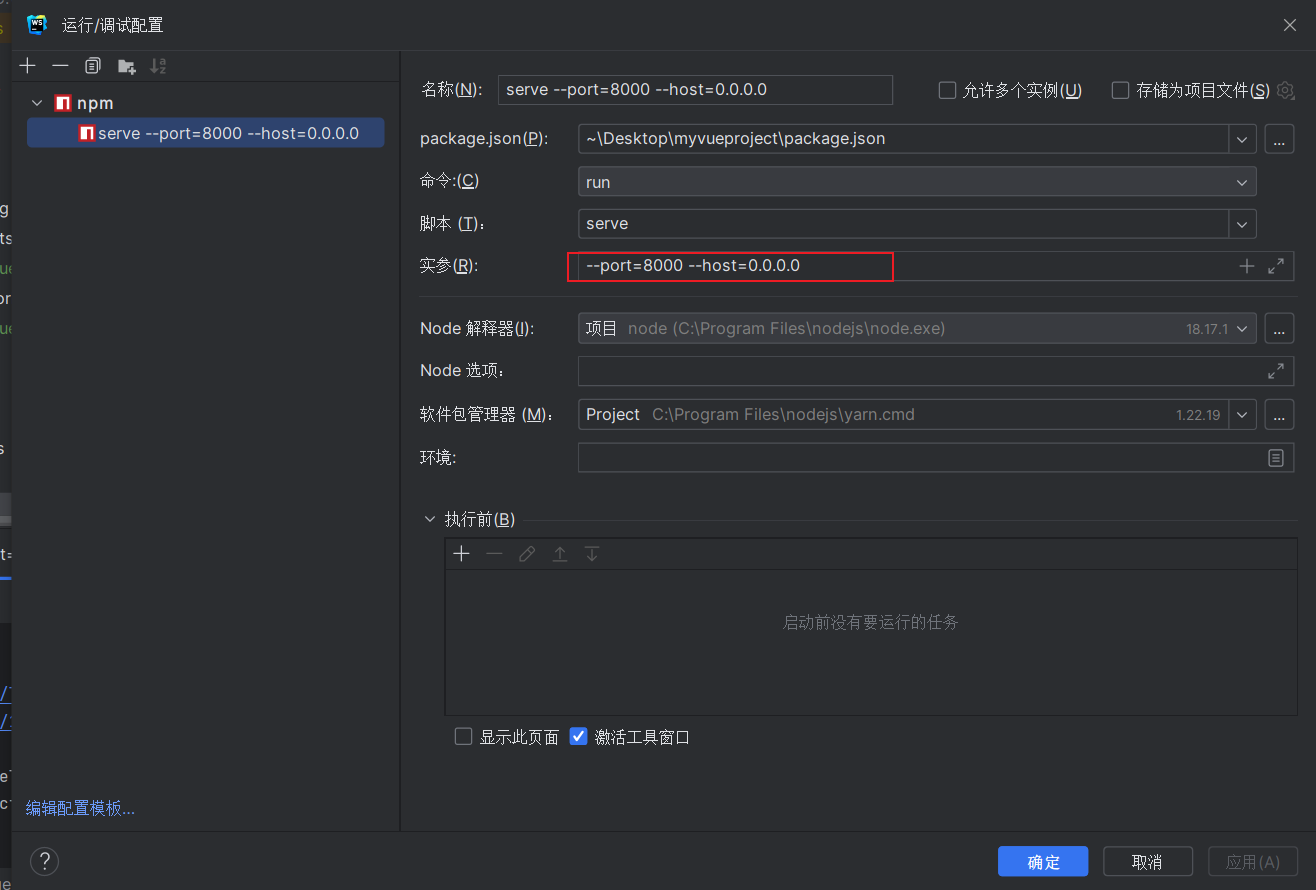
在实参部分添加port和host可以更改部署的端口和IP地址
1 | --port=8000 --host=0.0.0.0 |
然后就可以运行了
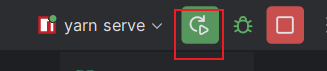
组件的嵌套
有时候开发vu项目时,页面也可以算是一个大组件,同时页面也可以分成多个子组件
因为,产生了父组件调用子组件的情况。
例如,我们就可以声明一个页面组件保存目录src/views,并提供2个页面组件,分别是Home.vue和Register..vue,作为页面组件
同时在src/components/创建一个保存子组件的目录Menu
做了几个操作:
创建Menu组件
1 | <script> |
从Register导入Menu
1 | <script> |
从Home导入Register、Menu
1 | <template> |
从App导入Register、Home
1 | <template> |
效果如下
组件嵌套的style影响
##Menu.vue文件中,我们对设置了button标签样式和class类选择器样式
注这里设置了局部样式
1 | <script> |
在Home.vue中
1 | <template> |
在App.vue中
1 | <template> |
就样式最内部发生了改变
去掉scoped,子组件的样式就变成了全局样式,如果你不是有意为之,那么就会造成了样式污染

组件之间传递数据
父组件的数据传递给子组件
例列如,我们希望把父组件的数据传递给子组件
可以通过props属性来进行数据传递
传递数据三个步骤:
父组件的数据传递给子组件
在父组件中,调用子组件的组名除,使用属性值的方式往下传递数据
1
2
3
4
5
6
7
8
9
10
11
12
13
14
15
16
17
18
19
20
21<template>
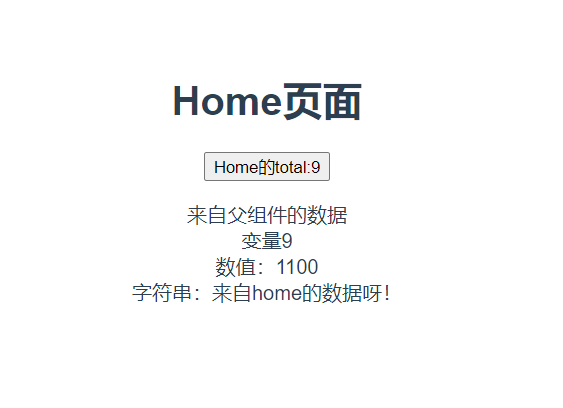
<h1>Home页面</h1>
<button @click="total++">Home的total:{{total}}</button>
<!-- 父组件要发送数据给子组件,通过组件的属性传递数据,属性名就是将来的变量名,传递则需要在属性左边加上:-->
<Menu :htotal="total" total="1100" title="来自home的数据呀!"></Menu>
</template>
<script>
import Menu from "@/components/Menu.vue";
const Home = {
name: 'Home',
data() {
return {
total: 0
}
},
components:{
Menu,
}
}
export default Home;
</script>在子组件Menu.vue中接受上面父组件传递的数据,需要在script中,使用props属性类接受。
1
2
3
4
5
6
7
8
9
10
11
12
13
14
15
16
17
18
19
20
21
22
23
24<script>
const Menu = {
name: "Menu",
//来自父组件的数据,全部通过props来接受,2种写法:json写法:必须指定数据类型,数组写法:不用指定数据类型
// props:{ //变量名:数据类型
// 数据类型有
// Number数值(整数,浮点)
// String字符串
// Boolean布尔值
// Array数组
// Object对象
// Function函数
// Promise异步对象
// default默认值
// 还可以做一些验证
// htotal:Number,
// total:Number,
// title:String
// },
props:["htotal",'total',"title"],//数组写法可以不写类型
}
export default Menu;
</script>在子组件中的template中使用父组件传递过来的数据
1
2
3
4
5<template>
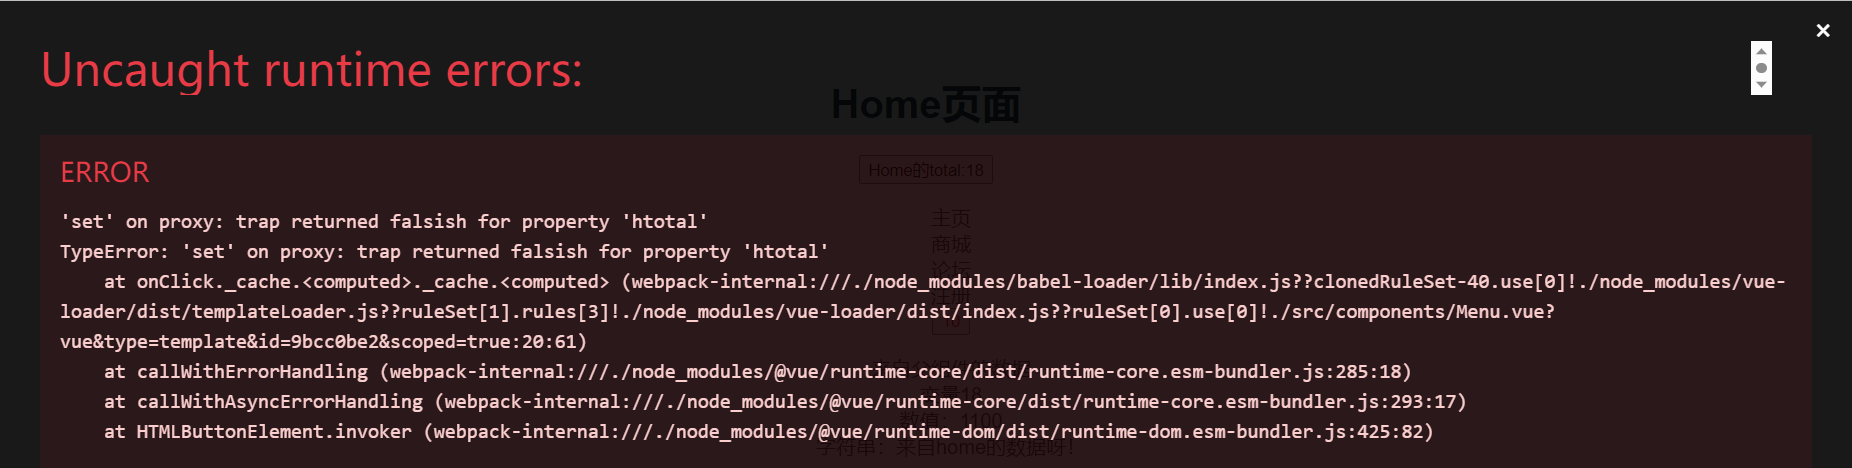
<p>来自父组件的数据 <br>变量{{htotal}}<br>数值:{{total}}<br>字符串:{{title}}</p>
<!-- <button @click="htotal++">{{ htotal }}</button>-->
<!-- 子组件不能直接对父组件转入的数据变量进行操作 -->
</template>

使用父组件传递数据给子组件时,注意以下事项:
- 传递数据是变量,则需要在属性左边添加英文冒号。
传递数据是变量,这种数据称之为”动态数据传递”,父组件数据改动的时候,子组件中被随之改动。
传递数据不是变量,这种数据称之为”静态数据传递” - 父组件中修改了数据,在子组件中会被同步修改。但是来自orops的数据,在子组件是不能修改的,因为不是data中声明的。在开发时这种情况,也被称为”单向数据流”
在子组件中对父组件传递的数据进行操作
1 | <button @click="htotal++">{{ htotal }}</button> |
单向数据流
所有的 props 都遵循着单向绑定原则,props 因父组件的更新而变化,自然地将新的状态向下流往子组件,而不会逆向传递。这避免了子组件意外修改父组件的状态的情况,不然应用的数据流将很容易变得混乱而难以理解。
所以子组件不能直接对父组件转入的数据变量进行操作
补充:父组件传递数据到子数据的过程中,可以给子组件设置对父组件的默认值和验证
1 | defineProps({ |
子组件传递数据给父组件
在子组件中,通过his.$emit()来声明一个自定义的信号(vue中称之为自定义事件名),父组件中针对这个信号(自定义事件)在调用子组件的组件名处进行@监听。
1
2
3
4
5
6
7
8
9
10
11
12
13
14
15
16
17
18
19
20
21
22
23
24
25
26
27
28
29
30
31
32
33
34
35
36
37
38
39
40
41<script>
const Menu = {
name: "Menu",
//来自父组件的数据,全部通过props来接受,2种写法:json写法:必须指定数据类型,数组写法:不用指定数据类型
// props:{ //变量名:数据类型
// 数据类型有
// Number数值(整数,浮点)
// String字符串
// Boolean布尔值
// Array数组
// Object对象
// Function函数
// Promise异步对象
// htotal:Number,
// total:Number,
// title:String
// },
props:["htotal",'total',"title"],//数组写法可以不写类型
data(){
return{
num:0,
message:'我是子组件里来的'
}
},
methods:{
add(){
this.num++;
//this,emit("自定义事件名",变量1,变量2……)
this.$emit("add_num",this.num,this.message)
}
}
}
export default Menu;
</script>
<template>
<p>来自父组件的数据 <br>变量{{htotal}}<br>数值:{{total}}<br>字符串:{{title}}</p>
<hr>
<p>要发送给父组件的数据,num={{num}}</p>
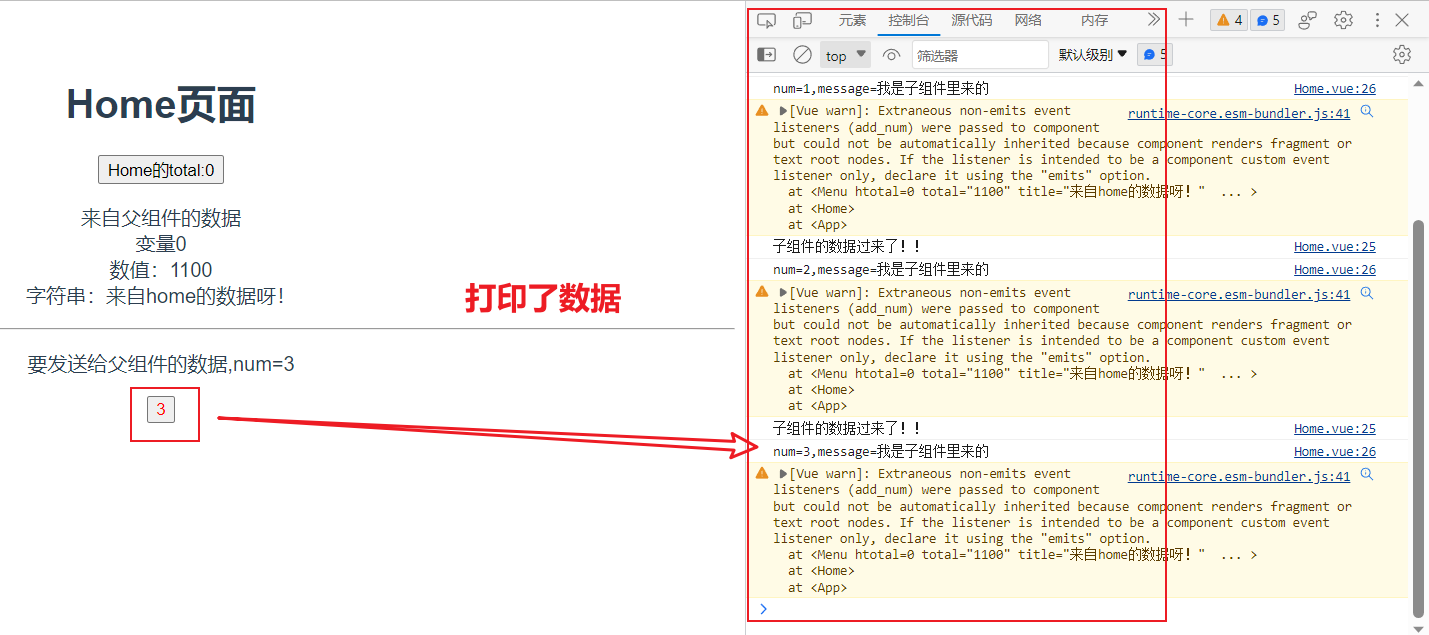
<button @click="add">{{ num }}</button>父组件中,声明一个方法用于在自定义事件发生时用于获取数据。
1
2
3
4
5
6
7
8
9
10
11
12
13
14
15
16
17
18
19
20
21
22
23
24
25
26
27
28<template>
<h1>Home页面</h1>
<button @click="total++">Home的total:{{total}}</button>
<!-- 父组件要发送数据给子组件,通过组件的属性传递数据,属性名就是将来的变量名,传递则需要在属性左边加上:-->
<Menu :htotal="total" total="1100" title="来自home的数据呀!" @add_num="get_data"></Menu>
</template>
<script>
import Menu from "@/components/Menu.vue";
const Home = {
name: 'Home',
data() {
return {
total: 0
}
},
components:{
Menu,
},
methods:{
get_data(num,message){
console.log("子组件的数据过来了!!");
console.log(`num=${num},message=${message}`)
}
}
}
export default Home;
</script>